Showing posts with label Mea. Show all posts

Monday, December 18, 2017

That's Just the Way I Roll . . .Jelly Roll, That Is

I would guess that most quilters who have been at it for longer than 2 minutes have at least one Jelly Roll in their stash. For my non-quilting family and friends (Mom), a Jelly Roll is not a tasty, fattening treat, nor is it a rapper from Nashville, but rather a collection of about 40 2.5 inch wide strips, sometimes rolled up and presented as a roll. Fabric company Moda coined the term, so other companies have other cute names - treats, buns, pops, roll ups.

As most of you know, I work at Mea Bernina, a sewing machine and quilting store, teaching machine  and quilting classes. What could be more fun, right? So at the beginning of 2016 I started teaching/hosting a club we called the Sassy Strippers - its all about fabric strips and Jelly Rolls.

This was a terrific challenge for me - to come up with different and interesting monthly projects that showcase various techniques, using our own curated jelly rolls, and then teaching the technique to anywhere from 12 to 20 sassy gals.  It was soooo much fun!

So we started where every self-respecting quilter would start - with the Jelly Roll Race. Did you know there is more than one? Jenny Doan of Missouri Star Quilt Company made a video tutorial that really popularized the JR Race.

Our Jelly Roll was a specially curated black and white roll, with fabrics from various collections that we had at Mea Bernina. So there is no other Jelly Roll like this available anywhere. We gave each Sassy Stripper a cut of a bright solid so that they could add in squares (JR Race 2) or triangles (JR Race 3) in between the strips.  We didn't really race, but some say they have completed it in less that an hour. I should time myself sometime and see - although I'm really not a very speedy sewist.


My intention for Sassy Strippers was to do different projects - not just quilts. So for our second project we featured a wonderfully creative string market bag. Bias strips were double folded and stitched together using the Bernina Binding Attachment. Then the resulting strong, double fold strips were then sewn together at intervals to make a string bag. Terrific! Mea Bernina has kits available to make this cool bag.


But wait, there's more! I really enjoyed coming up with interesting (hopefully) projects every month. I'll write more about the other projects in later posts. If you are interested in joining the Sassy Stripper adventure with me, we will continue it next year (2018) with a bit of a twist. After 20 projects with strips, we are branching out a bit. That's at much as I'll say here, but I promise it'll be fun! So, if you are curious about different techniques, want to get creative ideas with fellow sassy sewists, check out the Mea Bernina Class and Club listing and join us in January.

Keeping Curious!

Saturday, March 18, 2017

Learning and Laughing at Kimberbell Academy

I had a great opportunity last month to go with Mona and Liz from Mea Bernina to Logan Utah. Logan Utah? February? I know!
It was great!
Logan Utah is the home of Kimberbell Designs, a wonderful embroidery design company owned by Kim Christopherson. We were there to go through training so that Mea Bernina can offer very cool embroidery events. So now after the training we are officially a Kimberbell Certified Shop!

Our training was held in the gorgeous, spacious classroom at My Girlfriend's Quilt Shoppe owned by Kim's twin sister Kris. The shop has wonderful fabrics, including Kim's line of Kimberbell fabrics. I also bought some wool to use on Around the Garden (more about that in a later post).


We made a sampling of various types of projects from four of the main event collections: Pillow covers, goodie cinch bags, zipper bags, flower pins, and mug rugs. All absolutely adorable. What impressed me the most was how ingenious the digitizing team constructed the dimensional pieces - putting in zippers in the embroidery hoop, lining cinch bags in the hoop, using mylar and tule, and adding ribbon hanging loops.  Oh so much fun and so interesting! Our (Mea's) embroidery customers are going to love these projects! But until they are ready, we've got some other great Kimberbell classes. Check it out!


Logan Utah is in the Cache Valley, a beautiful vale surrounded by snow dusted hills. The trip there and back was also pretty cool. I had never been through north eastern Colorado or southern Wyoming before. The landscape was quite spectacular - barren and beautiful. The rock formations were awesome - perhaps they might inspire a future quilt!

Kimberbell rocks in so many ways - as a woman-owned and run business; as a source of sweet, cute embroidery designs (Kimberbell Kute); as a smart, customer-focused enterprise, and as great hosts in Logan.  Overall, a great trip!


Friday, March 3, 2017

One Block Wonder - One crazy fabric equals one GEORGEOUS quilt

OK I almost don't even know where to start about One Block Wonder (OBW) quilts. I love them! I probably buy more OBW fabric than any other type of fabric.


My love affair with OBW quilts actually started with a Stack-n-Whack class at Overbrook Quilt Connection. What's the difference between OBW and SnW? The OBW was designed by Maxine Rosenthal. The SnW technique was designed by Bethany Reynolds. They are close cousins - the quilts, not the designers (grin). Both are kaleidoscope quilts. Both start with layers of fabric cut in exactly the same place. OBW usually have 6 layers and SnW usually have 8. OBW are cut in equilateral triangles; SnW are cut in wedges or 90 degree triangles. OBW are usually put together without a background, SnW utilizes a background fabric. You can get books that feature both techniques.


The SnW class I took at Overbrook Quilt Connection a million years ago was wonderful, although I am sorry that I don't remember who taught it. Here is what I do remember: my friend Bobbie and I used the same focus fabric with different backgrounds - I used yellow, she used green. The teacher warned us not to get our fabric mixed up, but one look at my area and you could tell by the mess that it was mine. Bobbie's fabric was nicely trimmed and stacked and mine was all over the place. There was no way we were going to mix up our stacks of fabric!


My next one was a OBW. My son James wanted a black and green quilt, so I decided to make him a OBW (see the first pic in the post). After looking for just the right fabric for a month or so, I finally found a cool tropical flower print in Colby Kansas.  I bought 6 or so yards - enough for the 6 repeats of the pattern plus some extra for borders.  After cutting the triangles and putting together the half hexies, I set aside all the blocks with the bright red, yellow, orange and yellow flowers. So James' quilt was mostly black and green and I had plenty of leftovers for a bright tablerunner.

One of the things I love about SnW and OBW is that you can use fabrics that you wouldn't normally put in a quilt - or at least fabric that I wouldn't normally use. You could even use "ugly" fabric! Check out some of the fabrics before I stacked and cut, and then the resulting hexagons. Pretty amazing, yes? 

Western Belt Buckle fabric


Kaffe Fassett Floral fabric


The other thing I love about OBW is that the technique is fairly simple. You just layer the fabric, cut strips and then triangles, and then sew 2 sets of 3 triangles together to make 2 half hexies. The hardest part is laying the hexies out in a way that "flows".

The third aspect of OBW that thrills me is that you have a million options when it comes to the layout - you can add tumbling blocks, solid strips, make the layout asymmetrical, or any number of other creative options. 

I am going to be teaching One Block Wonder quilts at Mea Bernina sometime in the future. I've taught 2 classes already and people want more. So check out the website for upcoming classes and come play with OBW quilts with me! 

Just writing about OBW makes me want to go down to my studio and play with my pretty OBW fabrics!


Friday, December 23, 2016

Fabric Bowls - Possibly a New Addiction

I've always loved those fabric wrapped coiled clothesline bowls. I've got bowl envy - big time. My Pinterest "Fabric Bowl" board is full of bowls of various colors and sizes, and most exciting for me - handles. I love handles!

So if you want to join the bowl craze, here is what you'll need:
  •  Fabric - make it scrappy or use just one or two coordinating fabrics. I've used both batiks and quilting cotton. Batiks tend not to ravel as much. I cut my strips 3/4 inch wide. You can also use jelly roll strips or Fat Quarters if you want.
  • Lots of thread.
  •  Fabric glue - I like Roxannes Glue Baste-It.
  •  A few pins.
  •  A few Clover Clips.
  • Clothesline - 3/16th inch cotton or cotton-poly clothesline. Something not too stiff or too soft. You can find it at your LQS as well as your local hardware store, or big box discount store.
  • Machine capable of doing a zigzag stitch and one that has some piercing power. My Bernina had no problems getting through fabric and clothesline.
  • A 90/14 sharp needle.
There are several good tutorials out there, so I won't go into a lot of details on the how-to. There are also a few books available. I own this one - It's A Wrap.  Just know that it takes some practice getting the sides of your bowl at the angle you want. It's basically a matter of wrap, coil, sew, repeat. The wrapping takes the most time, but its a good TV watching activity.


I've made three bowls so far - one for our Sassy Strippers Club at Mea Bernina, one for my living room to hold potpourri, and a little bitty one to hold my cards at an upcoming show of some of my quilts (more to come about that). I've made each one a different shape and size and am experimenting with different handles. I'm also playing a bit with buttons and other embellishments. So, now I have a reason to look at awesome buttons when I'm out shopping.

I'm curious about all the various shapes and handles I can make! How about you?


Monday, April 13, 2015

It's Almost Time for the Quilt Show!

Four months sure went by fast! The Kaw Valley Quilters' Guild Annual Quilt Show is this Saturday and Sunday and I'm almost ready.

I have the privilege to be this year's featured quilter. Over the last several months I have felt excited, scared, overwhelmed, frustrated, ready, not ready and absolutely exhausted. Tonight I am excited and exhausted.

In the morning I am leaving for LA on a short trip, and I'll get back on Friday afternoon just in time for final set up.  Thankfully my friend Shari is hanging the majority of my quilts for me. 

I'm hanging 15 quilts and then showing 9 more that we didn't have space for (but really I didn't have time to sew on a hanging sleeve). Then I'm doing something a little different - at least I think it's different.


I'm going to show and talk about some UFOs. When people display quilts at a show, we see beautiful, finished quilts, and then I usually assume that the featured quilter has it all together - all their quilts represent a theme, they are all perfectly finished, including labels and documentation.  OK, so maybe they aren't as "perfect" as I am imagining. But it sure looks that way.

I plan on showing the more everyday, human side of quilting - the early practice pieces, the "can't wait to start" but don't finish quilts, the not so beautiful quilts, they are the ones I'm most excited about. I'll also have a display of some workshop projects that I'll eventually finish. I have learned so much about quilting over the last several years, and I've learned a lot about myself and life.

So, I'm still working on the details, I'm sure I will be down to the wire (like a lot of quilters). I'll be giving a short talk at 1:00 on both Saturday and Sunday. I'll be at the Mea Bernina table on Saturday and hanging around with my quilts on Sunday. So please come down to the show at Crown Toyota and visit with me. I'm sooooo excited!  


Wednesday, January 7, 2015

A Few Last "Present" BOMs

OK, before I move on to the BOMs I want to do in the future (or the ones I plan on starting tomorrow LOL), there are 2 last "current" ones I should write about. 

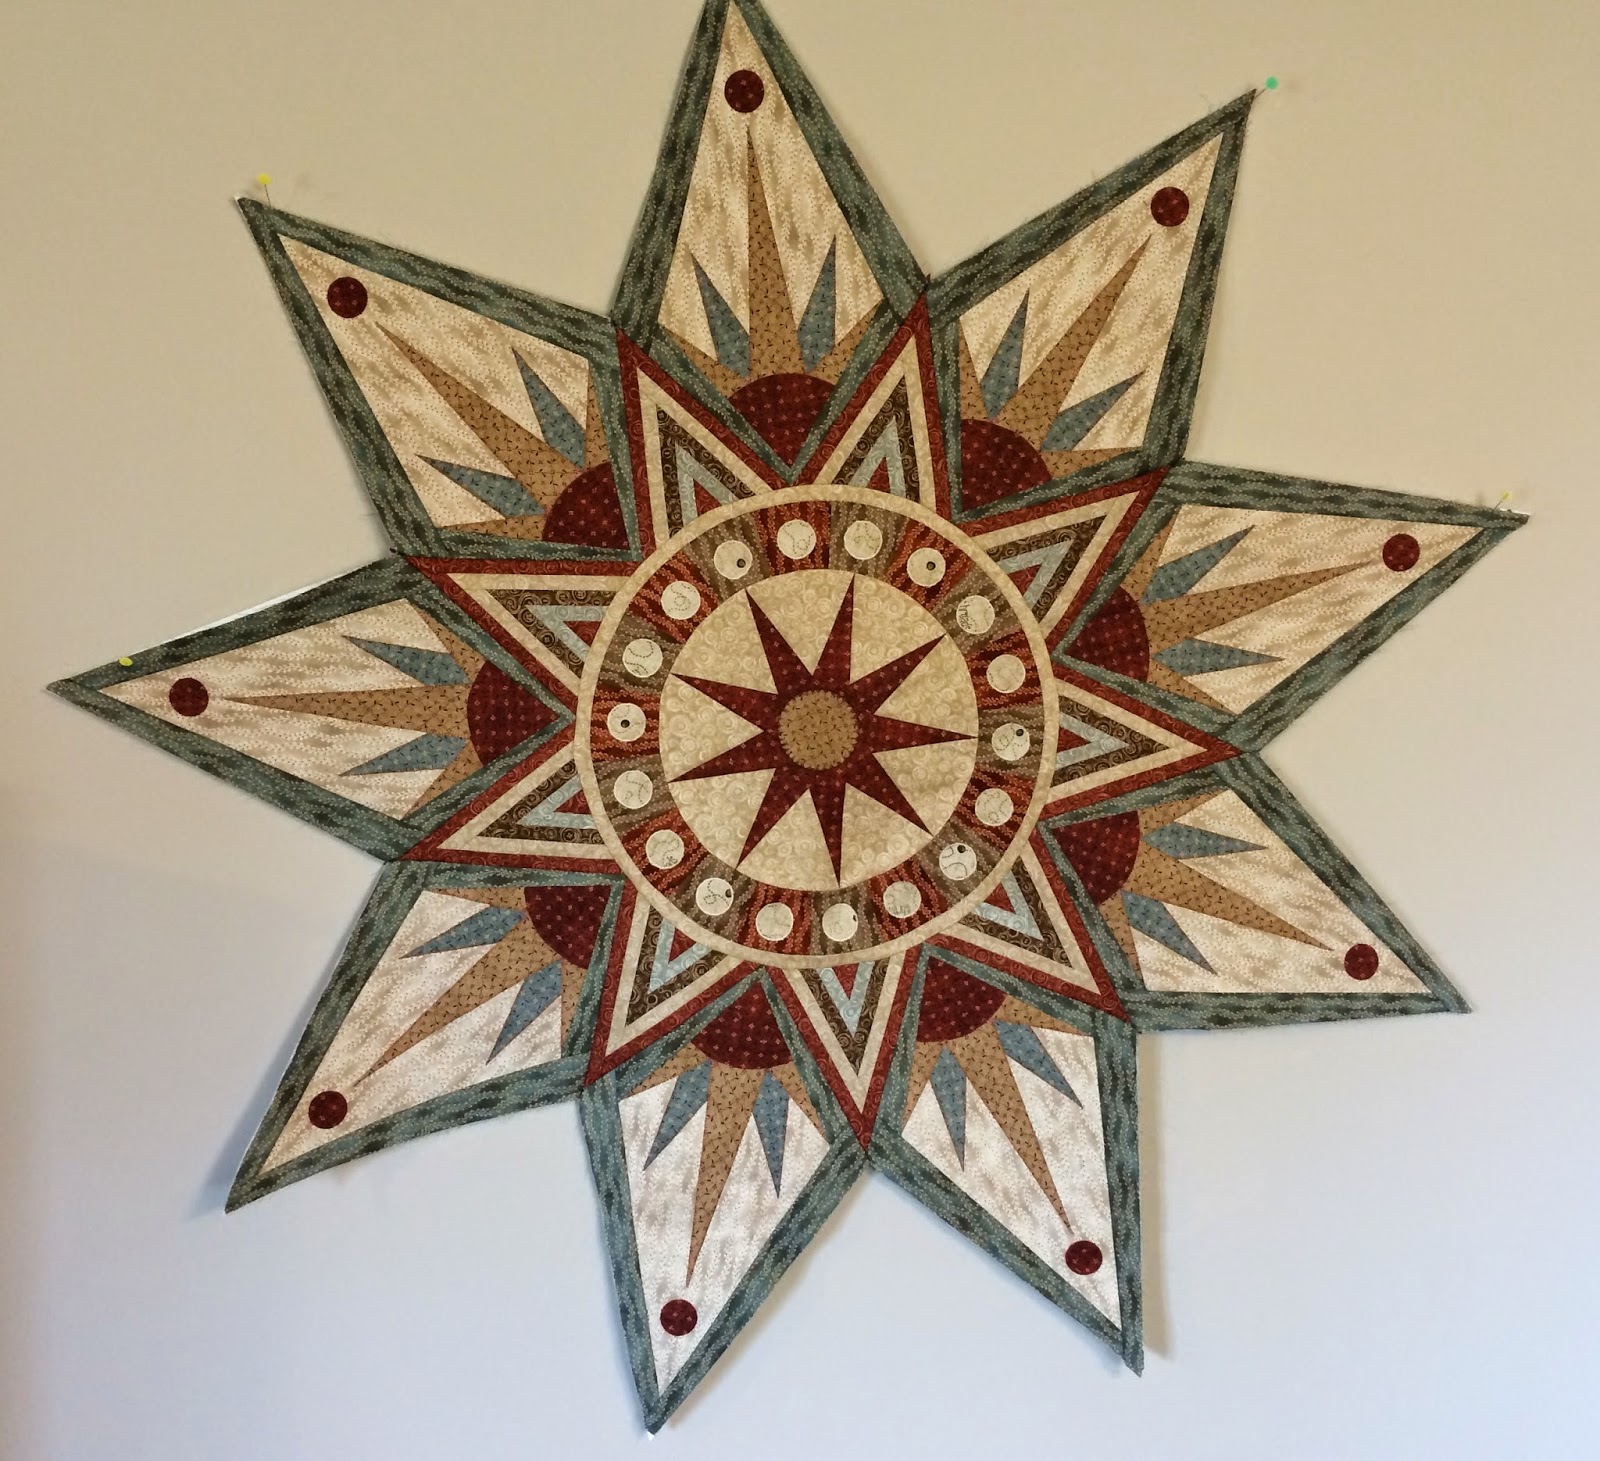
The first one is the Sedona Star, a Sarah Vedeler design I wrote about in my last posting. Sedona Star was The Quilt Show BOM for 2012. This quilt is built from the inside out. It is not a simple quilt. It requires precision cutting and piecing. The techniques featured are foundation paper piecing, applique, sewing set-in circles, and using the Accuquilt-GO! cutter to cut some of the applique shapes.

In January I started enthusiastically - I ordered the fabric for this classy, rich color-way of muted blues, tans, browns, and reds, started downloading the instructions, bought the special foundation piecing / stabilizer product - Ricky Tims' Stable Stuff Poly (a special product that you don't have to remove from the quilt - wash it and it turns into batting), and began working on the blocks. 

The first few months went smoothly. The foundation piecing was right on. The Accuquilt-GO! worked perfectly cutting the 12 circles in the center medallion. The appliques star points were perfect. Then it came time to set in the center circle into the circle of star points. Uh-Oh. The diameter of the center section was 3/8 inch too small. I wasn't sure what to do. So I decided to sit on it for a bit - perfectly logical, right?

Unfortunately "a bit" turned into several months and by the time I figured out how I was going to fix my problem, the BOM for 2012 was finished and the instructions were no longer available for download. An email message from Sarah Vedeler indicated I could buy what was once a free pattern (to TQS members) for $60. So, I fixed my problem (resew some seams with a smaller seam allowance) and waited a bit more until Mea Bernina offered Sedona Star as a BOM. 


So now I own the pattern and have a few partners in crime - a small group of ladies who are working on Sedona Star too. I have all the Month 3 foundation pieced stars completed and have done one of Month 4. I still have to set the stars into the background fabric, but I'll wait and do that after all 9 stars are done (end Month 5).
Whew! Sedona Star is not a piece of cake, but it sure will be gorgeous when I'm done!

The final "present" but not current BOM is another Quilt Show project - A to Z with Ewe and Me, designed by Janet Stone. I really like the whimsy of this quilt. It's obvious that Janet gets her inspiration for alphabet samplers from her cross stitch past. I hate to admit it but I only have "A" done. I've got lots to do on this one, but I'm really looking forward to it.

Well, that is all the past and present BOMs. 2015 is here, so there are surely some "future" BOMs coming soon.
Here's to a New Year, old and new BOMs, and long time (not old) and new stitching friends!

Thursday, January 1, 2015

A very productive BOM day!

What is a typical sewing day for you? For me, last Sunday was a super productive sewing day and it happened to include multiple BOMs! I wish I could say it was typical in terms of productivity, but I don't usually get quite so much done. It was typical in one huge way - variety.

"Typical" usually means multiple projects going at once, often at very different phases (design, cutting, piecing, quilting, finishing), and in very different colors and fabric styles. One thing I have learned about myself is that I get bored easily if I have to do too much of the same thing - same blocks, same fabric, same whatever. So I like to keep it varied. Sunday was a really varied day!

As you know I've got several embroidery BOMs going, so yesterday I made 2 tiles for the last Month 10 block for feathered star. I'm only 1 tile away from finishing all the star blocks. Then I will only have border blocks left to do - talk about boring, all 48 of them are exactly the same block with just one piece of fabric changing from block to block. Oh well, at least its bright, bold, happy fabric.

While my Bernina 830 was busy embroidering the feathered star (I'm needed for thread changes and adding pieces of fabric now and then, but mostly the machine takes care of it), I was working on last year's JayBird Quilts' BOM Toes in the Sand. Each month there are 2 blocks using the same pattern but with different fabric. So I got 2 blocks (Month 7 checked off my checklist) done and started cutting the pieces for the Month 8 blocks.

Then in the afternoon I scooted down to the shop for some sewing on the Sedona Star (more details in a later post). My friend Peggy is teaching the Sedona Star at Mea and I join in when I can. Class was cancelled yesterday due to the holidays, but Peggy was working on the shop sample, so I joined her and worked on the Month 4 paper pieced stars. I got one of three done!

As you know, sewing is fun, but designing and thinking about quilting is almost as, if not more, fun. In January I'm going to start a new BOM (details available in a later post) so I've been perusing Pinterest and other sites for ideas about color choices for the new
BOM. I found a FQ bundle of PB&J on Etsy and ordered it so I could potentially use some for this new BOM. Craftsy was having a year end sale, so I also ordered a few FQ bundles from them too.

Overall it was a productive day and I got lots of creative itches scratched (I'm sure there is a better metaphor than that but I used up all my creativity!).

Happy Productive Creativity to You!

Monday, December 29, 2014

More BOMs - Not Quite So Current

This next series of BOMs Current aren't quite as current as they should be, however, I foresee some completion this coming year.

First up is an internet mystery quilt by Linda Hahn. This was the first mystery quilt I have ever done. I saw it advertised in an AQS newsletter back in the beginning of 2013 so I figured I'd give it a try. I really like the idea of mystery quilts, but I haven't quite gotten used to not having control over the elements of the design. How do you know which fabrics to chose if you don't know where they are going to be used? So this time I went with the designer's fabric choices - besides, what's not to love about bright pink, blue, turquoise, lime green and purple batiks?

I still have a ton of blocks to make. This is the kind of project that I could easily get bored with  - making 20 of the same block - so I usually only do a few blocks at a time. This project will get moved up on the action list once my EH Modern Sampler is done and will hopefully be done in 2015 (don't hold me to it though).

Next up is a JayBird Quilts BOM that was offered through a lot of shops last year. I ended up doing it through Fons and Porter, though now I don't remember why F&P and not another shop. Toes in the Sand appealed to me for several reasons: 
1. I love the PB&J fabric that Julie Herman used for her sample and wanted to use that same fabric line (in fact I just found a FQ of each fabric in the line on Etsy and ordered the whole bundle for another quilt).
2. I like the idea of blocks being something other than 4-sided. Each triangular block is made up of several different shapes, but relies heavily on triangles.
3. She used a unique ruler that she designed - the Hex N More Ruler - to make the blocks. She has gone on to design other quilts with this ruler. In fact I'm teaching one next year at Mea Bernina called Park Bench.
4. I met Julie at the Sisters Oregon Quilters' Affair workshops in 2013 and I really liked her and her design philosophy. Check out all her cool stuff here.
I'm about half done with Toes in the Sand and will keep it in my active rotation in 2015, so I should have it done by the end of the year.

The third in this series of BOMs is one we offered at Mea Bernina last year. It was called a BuckABlock and featured half square triangles using Thangles.  Half the blocks are done in a turquoise small flower print and half in a red-violent larger flower print. I think I'm going to set the blocks on point with setting squares in between. 
Toward that end I bought Garden Couture by Embroidery Design Studio thinking I would applique and embroider flowers in the setting squares using the fabrics from the pieced blocks.  This project is also in my active rotation so I am aiming for completion in 2015.

So, I think I am almost at the end of BOMs "present". Only a couple more for next time. Whew, there are a lot of them! I'd better stop blogging and start sewing!


Friday, December 26, 2014

BOMs Present - Part 2: Keeping Current and Almost Current

Next on the BOM list . . .

So, I guess I'll start with my guild's BOM - it's an art deco version of flowers designed by Reeze Hanson of Morning Glory Designs. I actually spent last week catching up and now have 6 blocks done and I'm actually current through December! WOoHOo! I have no idea what the finished quilt will look like, but I'm liking the blocks so far. I'm using mostly a tone on tone fabric I really enjoy called Quilters Shadow by Stof, a Danish company. Here is the December Block, Tiger Lily.


My next BOM project is almost finished - pretty soon I'll be able to move it to the "past" list. Last year Mea Bernina hosted a modern mini quilt of the month club based on Elizabeth Hartman's Modern Patchwork book. I thought instead of making 12 mini quilt wall hangings I would try to make them using the same fabrics so that I could put them together in one large quilt.


I chose a fabric from the Habitat collection by Michele D'Amore with various soft colored dots as my focus fabric and then pulled other fabrics in to complement it. This is one of my favorite ways to select fabric! 


I've gotten all 12 blocks done and am now trying to figure out how to put them together.  I've got a post out on FB asking my sewing sisters whether to float or frame the blocks. the jury is still out, so if you have an opinion, I would love to hear it.  Framed in brown like the left side in the pic or floating on taupe like the right side?


Another BOM that I am almost current on is Fiesta Mexico by Karen Kay Buckley, hosted by Stitchin' Heaven, a quilt shop in Texas who sends the fabrics each month.  The quilt is gorgeous - the colors are rich and vibrant and the shapes are really sensuous. Unfortunately the instructions could use some explanation on how some of the blocks go together. I even called the shop when the pattern arrived and asked them if I was missing a part of the instructions LOL!.  I'm muddling through but I wouldn't be if I were new to applique. I've got the first 6 blocks done, except for the first block (top left of the quilt in the pic) - which includes some pieced triangles I'm not sure how to add.  

Til next time, Keeping curious and BOMing!


Wednesday, December 24, 2014

BOMs Present Part 1 - Embroidery

Wow, do I ever have a lot of BOMs that I'm working on! A couple of posts ago, I showed a picture of my spreadsheet that I use to keep track of my progress. Here it is again. I'm not sure if you can read it, but on this sheet I am tracking 11 different BOMs. Some of them have only 1 block completed (not even a whole month's worth), some are pretty close to being done. I wonder if I have some BOM in tubs that haven't made the list. I guess I had better look!


I'm working on several embroidery BOMs and the first one I started (in 2013) was Hoop Sisters' Feathered Star. I only have part of the last block to finish and then 48 blocks to do for the border. Each block takes about 50 minutes . . . so I still have a good deal of work ahead. This BOM was one offered at Mea Bernina last year and was the first time I really put my BR 830 Embroidery machine to use. It was a great way to get comfortable with my machine. Now I'm hooked. It's a good thing I have another machine - I start my embroidery machine and then turn to my BR 440 and work on a pieced or applique quilt.


Hoop Sisters comes out with a new Embroider-a-Block each year. The design for 2014 was Jacobean Journey. Of course, I also had to start this one - the colors are so rich and vibrant. I haven't gotten far at all - maybe only 2 blocks out of probably 100. I've worked on the blocks at Mea to help make the shop sample.  The pattern has several optional ways to combine the blocks, so I might put together a smaller version or a table runner.  We've received 2015's Embroider-a-Block at Mea and it is also stunning (like I said they are hard to resist). Sown Seeds is bright and fun, totally different from Jacobean Journey but just as beautiful.  This one will go on my future list!


The last Embroidery BOM on my list is actually a Row of the Month. It is called Tree of Life by AnitaGoodesign. Mea Bernina offered it as a class meeting for 2 days a month over 3 months. I couldn't attend all the classes, but I did get 2 and 1/2 rows done. It is a gorgeous design, and the best part are the dimensional leaves that are added when the quilt is done.  The three of us in class each used a different background. One was white, one was black, and I used a light blue background. I'm planning on putting it on the wall in my guest room which is bright and happy with colorful accents.

So, I have 3 current Embroidery quilt designs in progress. I intend to finish Feathered Star first before I move on to the others.  I'm sure other gorgeous embroidery BOM quilts will come along and move from my future list to my present list!

Happy Embroidering!