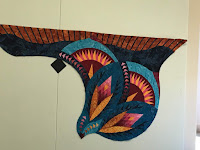
It's done! SQUEEEEEEE. Well, the top is done. So I'll call it done for now.
 I started this baby at Quiltworx University in Bakersfield in 2018. Now as I'm packing for Quiltworx 2019 at Tanque Verde Ranch in Tuscon Arizona, I am so pleased that I can take this top with me and show it off.
If you look at previous posts, you can see my progress from the planning stages, to the first cut, to the paper piecing sections, and the borders, and now to the last stitch (well not the very last stitch - it still has to be quilted and bound of course).
I started this baby at Quiltworx University in Bakersfield in 2018. Now as I'm packing for Quiltworx 2019 at Tanque Verde Ranch in Tuscon Arizona, I am so pleased that I can take this top with me and show it off.
If you look at previous posts, you can see my progress from the planning stages, to the first cut, to the paper piecing sections, and the borders, and now to the last stitch (well not the very last stitch - it still has to be quilted and bound of course).
 Assembly was not a quick, easy thing. There were LOTS of points to match to get this thing together. Also - it seems flat, but only my long arm quilter will know for sure.
The beauty of Judy's patterns (one of the beauties that is) is that once its done, you look at it and wonder "How did that go together?" She is a genius that way - Sections, Baby, Sections!
So, here are some tips for putting together large, complex sections into one larger, complex quilt:
Assembly was not a quick, easy thing. There were LOTS of points to match to get this thing together. Also - it seems flat, but only my long arm quilter will know for sure.
The beauty of Judy's patterns (one of the beauties that is) is that once its done, you look at it and wonder "How did that go together?" She is a genius that way - Sections, Baby, Sections!
So, here are some tips for putting together large, complex sections into one larger, complex quilt:
 1. Don't wait til the whole quilt is together to pull papers, trim threads and press. Give your self a break and do it by sections. Ask me how I learned that one (grin)!
 2. Use glue, pins, and sew basting to get those important points to match. I finally used sew basting to match it up - I increased my stitch length and just sewed just the areas that really needed to match. Even then, I needed to do some unsewing and re-basting. But once they did match, I sewed the whole seam again with a regular stitch length.
3. Be careful of bias edges. Judy does a lot in the design and fabric layout and cutting instructions to help you tame those bias edges. But there are still some stretch that you need to be careful of. I used a lot (a whole 16oz bottle!) of Best Press to keep my edges from stretching. I think it really helped me match my seams.
 4. This is a big (queen size) quilt, so when I was sewing the last few seams, it began to get a bit unwieldy. So I added a small portable table behind my machine to hold some of the weight so it didn't pull as I was going for that accurate quarter inch seam.
I am so happy with California Cat Tails. I am bringing it to Quiltworx University, and hopefully there I can send it home with a longarm quilter who can really make it shine.
The next post will be the finale for this series - California Cat Tails quilted and hanging - maybe in a show.
P.S. I did take this to Tanque Verde. It did not go home with a quilter, but I came home with a contact to send it to.
 I am getting close to being done with California Cat Tails. Check out previous posts in this series - A New Quilt From Start to Finish. In this post, I'll show you how Judy has us sew sections together - especially sections with curved seams.
 After doing the paper piecing, you have to trim the pieces on the final cutting line. Sometimes they have a curved edge - a straight ruler really doesn't work too well on a curved edge! So I turn the ruler over so the sticky bits are up (not against the fabric) and I turn the ruler as I cut. It takes a bit of practice but really works great, Judy does it freehand, but I find the pressure of the ruler on the paper and fabric gives me a more accurate cut.
There are a couple of tips that lead to successful curved piecing:
 1. Transition Reference Points (TRPs). These are points used to match the sections - much like those notches we cut in our middle school sewing class. On some of the pieces, you sew through the paper and fabric using a basting stitch - when you have one template for each fabric. For the pieces for which you have only one template for a stack of fabrics, you have to mark them first and then sew. I have found the best marking tool is the Sewline Trio. It has a fine erasable chalk lead in 3 colors - grey, pink and white.
 2. Smile over Frown - when you put the pieces right sides together flip them so that you are looking at the"smile". It is much more likely to sew without puckers if the smile covers the frown.
3. Match and Glue - match the ends (which have been trimmed with "smart corners") and the TRPs. Use a dab of fabric glue pen on these points and then ease the in betweens glueing as you go but making sure not to stretch the fabric, which is usually on the bias.
 4. Double S Curves - sometimes, you have to sew the curves in 2 parts so that in each part the smile is on top. Usually there is a TRP where the curve changes. So you sew from the end to the TRP, then flip the pieces over and sew from the TRP to the other end. Magic, Presto, its done!
So now I have the 4 quarters put together. I think they are pretty good looking if I do say so myself. Thanks to Quiltster I could audition the fabric before I even started cutting!
Curious about how it will look all assembled and quilted? Stay tuned.
 I started this quilt, Cattail Mixer (more creative name to come), last February at Quiltworx University in Bakersfield. I've been posting each step along the way from Design and Coloring on Quiltster, to Assembly Line Paper Piecing, completing the Center Star, and Appliqueing the Cattails. I am closing in on completing the final papers. Then starts the last chapter - assembly.
Since this quilt is a mixer, I got to choose from several different borders. There is an inner border, an outer border, and the outermost border. All the borders have millions of pieces! Last week I was at a retreat at Quiltworx in Somers Montana, and I spent some time (lots of time) doing border pieces. I got really good at assembly line paper piecing. I keep thinking I ought to count the pieces in case I want to give a smart a** response when someone asks me how many pieces are in the quilt. I still might do that.

 I put part of the outer border together to get an idea of how it was going to look, and I think it rocks! Now I just have to assemble more border sections and then work on the outermost border. Borders, Borders, Borders!
I'm getting close, I can almost taste the final assembly. I love the mixer quilts and can't wait to start another one - after I finish this one (she says, with her fingers crossed).
It's been a few weeks since I've posted and I have lots to write about. I'll start with the most recent event first and then go back and catch up. So for those of you who are aware of my schedule, it will be a bit out of order. No big deal!
Today is the last day of a six day retreat at the Quiltworx Retreat Center in Somers, Montana. I have had a great time - relaxing, productive, inspiring, and fun. I brought three projects to work on and then bought fabric to start a fourth.
First, lets talk about the Retreat Center. There are sewing stations (with design walls) for 12, beds for 10, 6 bathrooms, a kitchen, and a laundry. It is right next door to the Quiltworx Offices and Warehouse. Judy and her staff took really good care of us - great instruction, wonderful food (and I didn't have to cook OR clean up after), a trunk show of Judy's gorgeous quilts, a demonstration on Quiltster, camaraderie with terrific fellow quilters, and a shopping trip to two local quilt shops. All this set in the breathtaking scenery of the Flathead Valley in Montana. (BTW, weather was wonderful - 80s and dry with a slight breeze).
Next, the projects. We were all working on different projects. I took Vintage Rose, Cattails in the Meadow (see my series of posts on this quilt), Prismatic Star, and a new one - Bali Wedding Star.
 Several of us were working on Vintage Rose, so there was lots of demonstrations, comparisons, and helpful hints going on. I got all the paper piecing done and started the assembly. A few more hours and it will be ready for the quilter. This was my first Judy quilt, one of her technique of the month quilts. It features lots of interesting techniques like putting on veins (little accents on the petals), points (accent fabric at the top of the onion dome piece), registration points, curved piecing, and S and double S curve piecing. (ignore the black diamond, it is part of the design wall hardware). Here is a quarter of it assembled. I am really happy with my color choices and how its come together.
 Cattails will get a post of its own. I worked on border pieces (lots and lots of border pieces). Then I worked on border pieces, then some more border pieces. I am WAY over border pieces!
 The next project was Prismatic Star. Its a lone star pattern made with jelly roll strip sets - Judy's Gypsy set from Timeless Treasures. I got everything cut and three of the eight sets made. One of the great tips I got from Judy is how to line up and pin the star pieces so that the points come together perfectly.
 The last project I worked on was the Bali Wedding Star. I mainly just wanted to get started on this so that I could feel comfortable with the technique of assembly line paper piecing the arcs. I'm using rusty orange strips on a deep purple background. I think it will be stunning.
OK, now it's confession time: I bought more patterns. In my defense, I was looking at four terrific projects and ended up buying two from Judy and two on sale at one of the quilt shops. Ok, so that's still four, but I did use some restraint - I almost bought six! This is one of the main reasons I decided to drive, so I could bring back my haul of goodies!
On field trip day, Jennifer Eubank brought us to two local quilt shops - Glacier Quilts and Quilt Gallery. Both shops are Quiltworx Certified shops, so they had all of Judy's patterns and tons of batiks for the projects. In addition to getting some patterns on sale, I bought batiks for Bali Wedding Star.
I have a three day drive ahead of me and I'm excited to be going home (except for the cooking, cleaning, laundry, grocery shopping, hot and humid, going through mail part). I do have other quilts waiting to be worked on, but I'm sure I'll just have to work on my Judy quilts again soon.
Quilty friends, I can't say enough about the retreats sponsored by Quiltworx. They fill up fast, so run, don't walk to sign up for an upcoming retreat. You will not be sorry.
Curious about the Going-to-the-Sun road in Glacier National Park? Ask me about it when I get home. I'm going there tomorrow.
 In among the foundation piecing on Cat Tail Memories (yes, I've decided to name her), are some lovely applique cat tails and stems. What's the big deal about applique, you ask?
Well, Judy does applique in a WOW way. In each of her patterns that includes applique, she includes lazer cut sheets for each applique shape. Stitch-N-Peel sheets. These sheets are a cellulose material that softens when washed so you can leave it in. It can't be much easier than that!
All you have to do is peel the paper off the sticky side of the applique sheet and stick it to the wrong side of your fabric. Then cut it out with a .25" seam allowance, add a little glue stick and turn the edges under. And Voila! Each group of cattails leaves gets 3 or 4 of the fuzzy cuties.
The applique shapes in this pattern are quite simple. Some of her other patterns - Paradise in Blooms, Pepperdish, Cactus Rose, Diamond Wedding Ring, and Flowers for my Wedding Ring (I'm sure there are more) - have extremely intricate applique that would be so easy with Judy's Stitch-N-Peel method.
Curious? If you want to try Stitch-N-Peel in other applique patterns, you can order it from Judy's website.
P.S. If you missed Chapters 1-4 of my Cat Tail Memories posts, you can read them here.
Chapter 1 - Design
Chapter 2 - Color and Fabric
Chapter 3 - Preparing Papers and Fabric
Chapter 4 - Foundation Paper Piecing
Wow, its been quite a week with the Kaw Valley Guild's Quilt Show. The Show is now behind us and I am catching up with housework (yuck) and sewing (yeah). The show was a success by many standards. A lot of hard work by many people and also great fun and inspiration.
So, now that I am a bit caught up, I can work on my Judy Niemeyer Cattail Mixer. In previous chapters I designed and colored the quilt on Quiltster, and prepared the papers and fabrics. In this chapter I am working on one series of cattail sections. One of the best features of Judy's quilts is her method of assembly line sewing.
Actually, it should be assembly line sewing, pressing, folding, and trimming. Because the mantra here is "what you do to one piece, you do to all pieces". For Judy's patterns that could mean 4 pieces, all the way up to a hundred - on the border for example. In this case I have four sections.
For those of you who have done foundation piecing before, this is pretty much the same method. What is different is that you do several at the same time.
The first step is to lay out all your pieces that you prepared in Chapter 3. I aligned them in the order that they will be sewn with the "sew side" towards the top. In this case, I had 11 pieces of background and cattail leaves.
 When doing foundation piecing, you should reduce your stitch length so that the paper is easier to tear off. Its a bear to rip out if you make a mistake though . . . curse words have been heard coming from my studio. Judy recommends 1.6. So I adjust my trusty Bernina and I'm ready to go.
 Following the "do it for every piece" method, I lined up the first 2 pieces of fabric on each of the 4 papers. The beauty of foundation piecing, is that you just have to be able to sew on the lines. You get perfect points on difficult patterns just by sewing on the lines. I sew on line 1 four times. By the forth time, I really know that line well. Practice makes perfect!
 Second step is to press the seam open - yes, 4 times! I sometimes use getting up to the ironing board as exercise (don't tell my trainer Zach), but this method saves those trips. I iron all 4 papers at the same time. I guess I'll have to do real exercise instead.

Step 3 is to fold the paper back and trim the excess fabric away. Judy recommends a long piece of template plastic because you can get a good fold all along a long paper. Using an "add-a-quarter" ruler butted up against the template plastic gives you a nice straight cut edge.
 Now you do it again with the next piece of fabric, then the next, and next, sewing on lines 2 through 11 - you get the picture. I now have 4 raggedy papers, so obviously there are still a couple of steps left.
 Step 4 is to sew the registration lines using a basting stitch. This is one of the brilliant features of Judy's patterns. The registration lines help you put the sections together. This section has 3 registration lines on each piece.
 Now the last step, the fun part that really gives me a feeling of accomplishment - trimming the papers on the outside cutting line. If the lines are straight, I use a ruler. If they are curved I do it free hand.
So now I have 4 left side cattail sections complete. In this pattern there are a total of 4 different sections - 2 corner sections (left and right) and 2 center sections (left and right). As soon as I complete the 4 right side sections, the cattails will be done and I can move on to the inner border. The cattail sections include some applique stems and cattails which I'll address in the next chapter.
Keeping life curious with Judy Niemeyer!
Right! The design is finished (Chapter 1). The colors are chosen (Chapter 2). All using Quiltster. All that was fun, but now the real fun begins. First step - preparing the papers and cutting the fabric. Get ready to invest in ziplock bags!
 Judy's patterns are foundation paper piecing patterns. The patterns come printed on newsprint and are printed precisely so that if you align them carefully and then staple them together, you can cut them all out at once. The instructions say to trim them within about 1/8 inch of the outside line. I've occasionally been a little sloppy with my cutting - trimming about 1/2 to 1/4 inch away. It makes it a little more difficult to place your pieces properly so that they cover the space completely (for those of you new to foundation piecing, this will make more sense later).
Once I have all the foundation papers cut for the center section, I put them in a ziplock bag. Now it's time to cut the fabric. Before the fabric gets cut, the fabric layout sheets (also printed on newsprint) are cut out in the same manner as the foundation papers. However, the fabric layout sheets are cut right on the outside cut lines. This is so that you can lay them accurately on top of your fabric stacks.
 Fabric stacks??!! Yes, with Judy's method, you can cut stacks of fabric - saving time and possibly cut fingers. The instructions tell you how many of each color of fabric to stack. Then you place the layout sheets on top, paperclip them together, and cut the whole stack at once, cutting on the "cut" lines. The Quiltworx folks are geniuses - they even give you the proper order to cut the pieces out. This whole process saves time, fabric waste, and ensures fabric is on the proper grain. Judy has a video of this process on her YouTube Channel. Check it out!
 My center section uses 3 colors - 2 for the center spikes and the light teal for center background. Then I also had bright green and dark green "ribbons". Most of these fabrics were cut in a similar fashion and put into the ziplock bag for the center section. The pieces that will be used for foundation piecing are cut over-sized and the template shows the grain line and which side will be the side that you sew on. Several pieces - including the dark green ribbon - are cut exactly the size needed to sew on and might be marked by stitching reference points. Although I am showing a pic of the center section stitched and put up on the board, don't worry, I'll cover the foundation paper piecing process. I just wanted you to see the colors.
You can either cut all the papers and fabrics at once, or tackle it a section at a time. Remember your ziplocks! My quilt has 4 sections, each section requiring at least 1 bag, some needing as many as 7.
 OH, I almost forgot something. How do you know, besides looking at your Quiltster picture, which fabric is used where in each section? This is so cool - for each section the instructions have a place to put a tiny slice of each fabric - a key code if you like. Don't even think about skipping this step. Many times I looked back at my key to make sure I was using the correct fabric.
So now my papers are cut, fabrics are cut and everything is waiting nice and neat in multiple ziplock bags - labeled with a sharpie of course. Quilters should buy stock in ziplock bags and sharpie markers!
Next Chapter - Judy's assembly line techniques for foundation piecing.
 Now that I have the different sections of this
quilt chosen (check out this previous post about designing this quilt), I get to color it. Quiltster is a great tool for auditioning fabric. There is an option to choose fabric collections - Judy's fabrics, Kaffe, Bali Watercolor Batiks, and more. Excitement building, big time!

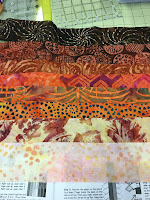
 To give myself some limits, I only designed with the 1895 Bali Watercolors. Even then, there were so many to choose from. I would suggest identifying a color scheme and sticking with 4-6 hues and their cooresponding tones. I have a board on Pinterest reserved for color schemes. I saw these leaves and it immediately spoke to me. This would be my palette.
 Just for fun, I tried a few other ones. In this one I used peacock-inspired colors. I get a big kick out of coloring quilts that I may never make. It helps get me out of my color box.
So here is what I finally decided on. Not quite as much purple as in the leaf picture, but I like how it turned out. At this point, I still haven't seen the fabrics next to each other, so I'm taking it on faith.

Another cool feature of Quiltster is that it gives you a yardage chart - either total or by block. At Quiltworx University, we were the guinea pigs for the newest feature of the system - the fabric requirements were sent straight to the quilt shop that was hosting our event, Thimble Towne. So my fabric was cut into strips and was waiting for me when I got there. Although I do enjoy the fabric shopping aspect of quilt making, this feature would save lots of time. I'm not sure how many or which stores will be connected to Quiltster, but I'm excited to find out.
Check out Quiltster - even when you are not designing a quilt, it's a great creative on-line activity.
 I started this baby at Quiltworx University in Bakersfield in 2018. Now as I'm packing for Quiltworx 2019 at Tanque Verde Ranch in Tuscon Arizona, I am so pleased that I can take this top with me and show it off.
  Assembly was not a quick, easy thing. There were LOTS of points to match to get this thing together. Also - it seems flat, but only my long arm quilter will know for sure.
  1. Don't wait til the whole quilt is together to pull papers, trim threads and press. Give your self a break and do it by sections. Ask me how I learned that one (grin)!
  2. Use glue, pins, and sew basting to get those important points to match. I finally used sew basting to match it up - I increased my stitch length and just sewed just the areas that really needed to match. Even then, I needed to do some unsewing and re-basting. But once they did match, I sewed the whole seam again with a regular stitch length.
 4. This is a big (queen size) quilt, so when I was sewing the last few seams, it began to get a bit unwieldy. So I added a small portable table behind my machine to hold some of the weight so it didn't pull as I was going for that accurate quarter inch seam.


