Showing posts with label teachers. Show all posts

Friday, August 12, 2022

Cruising and Quilting - Does it Get Any Better Than This?

Me: We should go on a quilting cruise!

Friend: Yes we should. Here is a good one.

Enter COVID and everything got cancelled.

Friend: I think cruises are going again, want to go on this one to the Eastern Caribbean?

Me: Sure Do!

We booked through Dawn at quiltandcruise.com. The teacher is Annette Ornelas of Southwind Designs. The Quilt is cute. I buy the pattern and choose the fabrics, The excursions look good, we sign up for a couple. We wait, and wait. We get vaccinations. We get tested. It's a GO!!!!

I love cruises anyway, but a quilting cruise combines the best of all
worlds. The plan is to sew only on sea days, reserving port days for excursions. We boarded the hugest cruise ship I have ever seen in Fort Lauderdale - Royal Caribbean's the Allure of the Seas. After getting settled, we met in our sewing room on Deck3 and got to know our machines, Jenomes provided by Scott.


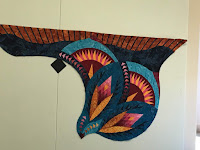
We we got to start on our projects the next day. Teacher Annette was amazing. She developed a very cool technique of inserting fabric between 2 other pieces of fabric and then after sewing and pressing, it looks like an elongated flying geese block. Except that it's dimensional and after piecing the rest of the block you are supposed to fold the points up and top stitch them. This results in the cutest little curved points.  Needless to say, I bought several of her patterns to take home. One especially would make a great class project.


Dawn set up a private trip to Caribelle batik factory for the day we were in St Kitts. The site was beautiful, nestled into a little valley, with gorgeous foliage of every size, shape, and color. 


We were able to use stamps dipped in wax to make our designs - I used turtles - and them dye them in purple or a deep indigo dye bath. It was wrapped up in bags and safely stowed until I got home to rinse the extra dye out. I had blue fingers for a day!


Of course we had the opportunity to shop in their store. I bought a poncho thingy that will look great with some brown leggings and a 4 yard piece of fabric that I intend to use as a backing for the quilt I made during the cruise.


The eight days went by way too fast. Some of the 38 quilters in the group finished their tops plus the bonus projects Annette gave us. I got a little over half done. I plan to work on it during a couple of upcoming retreats. 


So I'm back home, having to make my own bed, prepare my own food, no cute little towel animals waiting on my bed, no more rum punch under tropical canopies. I'm dressing in layers because it's 35 degrees outside. But I'm already planning my next cruise with Annette - next April. Saving my pennies.

Come cruise with me!


Tuesday, January 1, 2019

2019 Quilting Goals

Gosh, can a whole year have passed by so quickly? Zoom, Zoom!

Any new goals obviously (for me) require a revisiting of last years goals to see how I did. I wouldn't want to have to put the same goals on my list because I made no progress!

I had 5 goals and I am pleased that I made pretty good progress on all of them.
1. Use my rotation system - check!
2. Blog every other week - check! Sometimes every week, sometimes once a month. But I'm OK with that.
3. Prepare a trunk show - check! In fact, I've presented it at one guild and have 2 more scheduled.
4. Publish Kansas Goes Modern - Check! It's available on my Etsy Shop.
5. Design and make 2 quilts for my 50 Quilts from 50 States Project - Check! Kansas done and Missouri almost done.


OK not too bad - I wish I had done this well on my other resolutions and goals.


Ok, now for 2019 goals. Some of my previous goals I am dropping because they are habits by now and don't need to be on a goal list. Others are repeating because they really work for me. A few are minor things that may pay off big in term of reducing my quilting frustration level. A few are longer term goals that I want to start on now. So here goes . . .

1.  Prepare 2 more trunk shows.
2.  Prepare 3 workshops.
3.  Get 5 more gigs lined up for 2019.
4.  Trim my threads immediately after sewing. (I really shouldn't need this as a goal, but what can I say, I've gotten lazy about trimming threads).
5.  Design the BOM for KVQG 2019-2020.
6. Explore Artist In Residence programs.
7.  Design and publish 3 more 50/50 quilts.
8.  Get 3 old UFOs done.
9.  Start ball rolling and make contacts to be a teacher at the 2021 Kansas City Regional Quilt Festival.
10.  Start ball rolling and make contacts to be a teacher on a quilt cruise by 2022.


I'm curious about your quilting goals. Share in the comments. I'd love to know what you are doing this year.

Thursday, October 11, 2018

My Favorite Designers - Chapter 7 Kaffe Fassett and Friends

Yesterday I had the pleasure of attending my second workshop with Kaffe Fassett and Brandon Mably at Sarah's Fabrics here in Lawrence (here is a post about my first workshop at Sarahs). WOW! This was a color class - and man did we do color!

I have also been to two lectures by Kaffe during which he provided some background, experience, previous patchwork, knitting, and needlepoint works, and sources of inspiration. Many of you know him and know about his art. I continue to be impressed by his legacy. I can't even begin to do justice to his body of work. I encourage you to read his biography on his website - you'll be amazed!

Kaffe and Brandon are two-thirds of the Kaffe Fassett Collective - the fabric design company that also includes Philip Jacobs. These three men have totally turned the quilting fabric world on its head (IMHO). Large patterns, rich colors, fanciful scenes - oh my it is glorious - Glorious Color that is!

So, as I have categorized it in my little quilty mind, Kaffe is all about fabric design and color. His quilt patterns are fairly simple in terms of design, what makes them sing is the fabric and the way he puts color and pattern together. So color and pattern is what we learn in his workshops - not color theory or anything so "boring" but working outside our comfort zone with color combinations and wild, daring patterns we wouldn't normally use. 

After a day of cutting hexagons and triangles and putting them up on a gray flannel design wall, Kaffe goes around and "critiques" our work. It was so interesting to see how different setting triangles changes the whole look of a quilt that used the same color hexagons. Here are a few examples of yellow hexagons and the variations in setting triangles. Many thanks to my class mates for their wonderful examples (sorry, I did not get everyone's names).


In order to provide some focus, I choose Moroccan Spice Market as a theme and narrowed by pile of Kaffe Collective fabrics down to paprikas, chili powder, a bit of tumeric, hot red, orange and pink. I wanted the reds to glow and zing, so I choose a dark blacky purply smoky series of 6 fabrics for my triangles. I'm happy with the outcome. I'm planning on making Moroccan Spice Market about twice as large as it is now, so I have lots more hexies and triangles to cut.

This quilt is from Quilts in Moccoco. His books have patterns, but are more like coffee table books with wonderful photography. Check them out, they are gorgeous.

Although I don't feel like I know Kaffe, Brandon, and Philip as well as the other designers in my Favorite Designer series, I know and love their fabrics and look forward to each new release. Sarah's hosts a Kaffe Club which meets monthly to celebrate and challenge ourselves to use Kaffe Fassett Collective fabrics. I have learned so much from and been inspired by these creative ladies in the club. Now I can spot a KFC (not the chicken) fabric at 50 feet.

I've joined the Kaffe Collective on FB and get to see amazing quilts made with amazing fabrics.  I also follow Philip on FB and love seeing how he makes and paints his fabrics  - when he's not scouring the English countryside for old WWII bits and pieces using his metal detector.

I have a few other quilts made from Kaffe Collective fabrics. Some finished, some almost finished, and some in my pile of many UFOs. I have 4 shelves on my FQ storage tower devoted to KFC fabrics. I'm smitten, in love, hooked. 


Curious about KFC? Get a book, follow on FB, get some KFC fabric. Jump into color and pattern. Wallow around in wonderful!


Saturday, July 14, 2018

On Retreat in Montana with Judy Niemeyer and Jennifer Eubank

It's been a few weeks since I've posted and I have lots to write about.  I'll start with the most recent event first and then go back and catch up. So for those of you who are aware of my schedule, it will be a bit out of order. No big deal!

Today is the last day of a six day retreat at the Quiltworx Retreat Center in Somers, Montana. I have had a great time - relaxing, productive, inspiring, and fun. I brought three projects to work on and then bought fabric to start a fourth. 

First, lets talk about the Retreat Center. There are sewing stations (with design walls) for 12, beds for 10, 6 bathrooms, a kitchen, and a laundry. It is right next door to the Quiltworx Offices and Warehouse. Judy and her staff took really good care of us - great instruction, wonderful food (and I didn't have to cook OR clean up after), a trunk show of Judy's gorgeous quilts, a demonstration on Quiltster, camaraderie with terrific fellow quilters, and a shopping trip to two local quilt shops.  All this set in the breathtaking scenery of the Flathead Valley in Montana. (BTW, weather was wonderful - 80s and dry with a slight breeze).


Next, the projects. We were all working on different projects. I took Vintage Rose, Cattails in the Meadow (see my series of posts on this quilt), Prismatic Star, and a new one - Bali Wedding Star.  

Several of us were working on Vintage Rose, so there was lots of demonstrations, comparisons, and helpful hints going on. I got all the paper piecing done and started the assembly. A few more hours and it will be ready for the quilter. This was my first Judy quilt, one of her technique of the month quilts. It features lots of interesting techniques like putting on veins (little accents on the petals), points (accent fabric at the top of the onion dome piece), registration points, curved piecing, and S and double S curve piecing. (ignore the black diamond, it is part of the design wall hardware). Here is a quarter of it assembled. I am really happy with my color choices and how its come together.


Cattails will get a post of its own. I worked on border pieces (lots and lots of border pieces). Then I worked on border pieces, then some more border pieces. I am WAY over border pieces!


The next project was Prismatic Star. Its a lone star pattern made with jelly roll strip sets - Judy's Gypsy set from Timeless Treasures. I got everything cut and three of the eight sets made. One of the great tips I got from Judy is how to line up and pin the star pieces so that the points come together perfectly.


The last project I worked on was the Bali Wedding Star. I mainly just wanted to get started on this so that I could feel comfortable with the technique of assembly line paper piecing the arcs. I'm using rusty orange strips on a deep purple background. I think it will be stunning.

OK, now it's confession time: I bought more patterns. In my defense, I was looking at four terrific projects and ended up buying two from Judy and two on sale at one of the quilt shops. Ok, so that's still four, but I did use some restraint - I almost bought six! This is one of the main reasons I decided to drive, so I could bring back my haul of goodies!

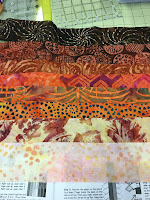
On field trip day, Jennifer Eubank brought us to two local quilt shops - Glacier Quilts and Quilt Gallery. Both shops are Quiltworx Certified shops, so they had all of Judy's patterns and tons of batiks for the projects. In addition to getting some patterns on sale, I bought batiks for Bali Wedding Star.  

I have a three day drive ahead of me and I'm excited to be going home (except for the cooking, cleaning, laundry, grocery shopping, hot and humid, going through mail part).  I do have other quilts waiting to be worked on, but I'm sure I'll just have to work on my Judy quilts again soon. 

Quilty friends, I can't say enough about the retreats sponsored by Quiltworx. They fill up fast, so run, don't walk to sign up for an upcoming retreat. You will not be sorry.

Curious about the Going-to-the-Sun road in Glacier National Park? Ask me about it when I get home. I'm going there tomorrow.


Monday, March 26, 2018

My Favorite Designers - Chapter 4 Julie Herman

My introduction to Julie Herman of JayBird Designs was at the Sisters Oregon Quilters Affair - the workshop week before the annual outdoor quilt show. I've had the pleasure of going there twice - once in 2013 and again in 2015.


One of my courses on the first trip was Chopsticks. I thought it would be the perfect pattern for a series of  crazy purple, salmon and greeny/gold fat quarters I bought on a cross country road trip. They were wild and at that time, a little outside my color comfort zone. I added a sashing fabric that was even more outside my norm. I call this one Hazardous Material because the acid green evokes a feeling of toxic material. I love it!


Julie's class was awesome. As she says, her "superpower is geometry and design". And Boy is she a s-hero. She puts such thought into her designs. She designed a set of rulers - Hex N More and Sidekick - that are used in most of her patterns. With these rulers you can cut so many shapes. And they all play well together!


So this workshop got me hooked. The next quilt to come to my attention was a BOM called Toes in the Sand. I loved the colors. Loved the look of the repeating triangles. Kelly Cline quilted my Toes in the Sand. And of course it was perfect.
I don't know if this was Julie's first BOM with repeating shapes, but I was hooked.  First Triangles, then . . . 


Hexagons - Park Bench. I am hoping to teach this at Mea Bernina and I had so much fun making the shop sample. Turquoise, green, and orange fabrics on a dark blue background. Stunning if I do say so myself.


Ok, so now I was on the lookout for more. The next one I did was Gravity - in fact I just finished it last week and it is in the "to be quilted" pile. Following Julie's style of repeating shapes, Gravity is a series of 18 diamonds. This quilt was offered by several shops as a BOM in solids, but I chose to do it in batiks instead of solids and I really like how it turned out. It was quite a challenge to get enough batiks of the right colors and I argued with myself about whether to continue Julie's design for the dark to light background, or just do a dark background. In the end, I went with her original design. It still needs to be quilted, and it's huge! This is my 6'2" son standing on a chair holding up the quilt.

I have several other JayBird patterns and BOM waiting to be started. The one calling my name the loudest is Sweet Tooth. 

So, I highly recommend Julie's classes and patterns. Julie is a fresh, young designer and great teacher. Her patterns are fun, interesting, geometric beauties. Oh, and I just saw her post on FB that she is expecting her first baby. Congratulations Julie and and hubby Lawrence.

Curious about Geometry? Check out Julie and JayBird!


Monday, May 8, 2017

Tile Applique

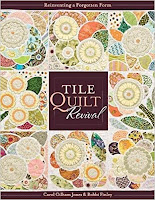
I have long drooled over the gorgeous tile applique quilts in Carole Jones' book Tile Quilt Revival. So when a sample of a small tile quilt appeared on the wall at Sarah's Fabrics with a sign saying classes were forming, I jumped at the chance to take it. 

Three wows - getting to take a class from Carol, whose work I have admired for years, the class pattern - sort of stylized leaves, and the fabric in the class kit - Kaffe. I couldn't pass it up.

I did have a bit of angst though. I had taken classes and tried four or five variations of needle turn hand applique (needle turn, prepared pieces, back basted) and it never caught on. I did not like hand applique. One might even say it stronger - I loathed hand applique.
But I went into this with a positive attitude - after all it had 3 wows going for it. 

So, what makes this tile applique? The grout! The shapes are basted right next to each other so that when 1/8 inch allowance from each shape is turned under, it looks tile with grout in between.

Carol is a great teacher. The pattern was just complex enough so that I wouldn't lose interest, but not so difficult that I'd never finish. Of course the Kaffe fabrics were a wonderful mix of color and pattern. Her verbal and written directions were spot on - she had us use freezer paper to trace the pattern and cut out the shapes, baste them in place and in no time I found myself with needle in hand, turning under a 1/8 inch seam allowance.


Now just 2 short weeks later, I have one (of four) panels completed and have started on the second. And I am loving it! My grouts are almost consistent, points are pointy, and inner curves are curvy and I'm loving the look of it.

Curious about Tile Applique? Check out Carol's book. It's a old technique but with a fresh new look.


Wednesday, March 8, 2017

Autumn Path - A Confetti Project

Every time I sit down to write about a quilt or project, I think its my favorite! Yes, they are all my favorites - like your kids, you really can't choose. They are each special for different reasons.

Autumn Path is special for several reasons. First, it is my first confetti quilt. Second I learned this technique from Japanese quilter Noriko Endo. Third is that it is the first quilt that I actually sold! My baby is going out into the world!

OK, let's start at the beginning - I was visiting my Mom in Glendale, Arizona in 2014. At that time there happened to be an AQS show in Phoenix. Ohhhh two birds, one stone. 

In our materials list, Noriko asked that we bring a picture that we wanted to recreate in fabric. I found a photo on the internet of a path through a wood in beautiful autumn colors. 

First she had us lay down large blocks of color for the background. Then we sliced up fabric into matchstick size pieces. I used mostly batiks so that no matter what side was up it was the right side. 
After laying down the confetti pieces for the leaves and the path, I covered it all with a layer of black tule. We could have used any color, but I think black worked well. Some free motion quilting on the tule ensured that all the little confetti pieces were trapped under the tule. 

Next came more confetti to give depth and perspective. Finally, before a second layer of tule, Noriko went around the class and added little bits of turquoise, pink, and purple confetti. She said it was the secret ingredient to make our landscapes "pop". A final layer of tule and then some thread painting to highlight some areas and lowlight other areas. I finished it off with deep red piping and black binding.


Autumn Path was hanging at my mini-show at the Unitarian Universalist Fellowship Founders Hall, and really grabbed the interest of the membership there. It's new home is with E. Jay Hilty. I'm glad he will be enjoying it.

If you ever get the chance to take a workshop with Noriko, run, do not walk, to sign up. She is a great teacher and a beautiful artist. Her book is a good reference, but nothing beats the real thing!

Curious About Confetti?


Tuesday, January 31, 2017

Houston Class #4 - Bent Star with Gyleen X Fitzgerald

I first became acquainted with Gyleen Fitzgerald through a sew along on Facebook.  She was guiding us through a mystery stash buster called Bricks, Cobblestones and Pebbles, which she subsequently published in book form. It is a really cool pattern and is a great way to use up some of your scraps.  
So when I saw her on the class program at Houston, I jumped at the chance to meet her in person. I wasn't disappointed. She is a dynamo!

Her class, Bent Star, was a class in which we learned some piecing techniques including how to handle set in seams. My first challenge was fabric choice - I loved her colors and wanted the same bold impact without being a copy cat. I was able to find darker and lighter tone on tone fabrics in 4 different colors - fuscia, teal, green, and brick.  I chose two shades of brown for the small kite shapes. I think it looks sort of 3-D because of the light/dark values of the same colors.
I started with a dark blue for the background, but the teal blocks just faded away. Since I really wanted the star to pop, I tried several light greys before finally settling on this very light grey.


Gyleen quilted hers with straight lines and angles. Not feeling quite up to so many absolutely STRAIGHT lines, I decided to do come gentle curves - all going horizontally across the quilt.  I'm pretty pleased with the results. It makes a very stunning wallhanging.
Check out Gyleen's stuff!